
Photographing a Cemetery
We love getting photo submissions and appreciate your support! To help us do our job more efficiently, please follow these guidelines:
🍁 Check first – Make sure the cemetery you’re submitting hasn’t already been photographed for the project.
🍁 Let us know first– Planning to take new photos? Please contact us beforehand so we can confirm no other volunteers are currently working on that cemetery.
🍁 Follow our guidelines – See the file submission details below. If you’re unsure about anything, feel free to ask before sending in your photos.
Photos do not need to be edited or indexed.
Signing Up
🍁 How to Sign Up
- Locate the cemetery on our website.
- Click ‘View.’
- Fill out the volunteer form.
- Wait to receive confirmation from our volunteer coordinator before proceeding.
🍁 Liability Notice
Your safety is important. We cannot assume responsibility for any injuries or accidents while photographing a cemetery.
Please be careful:
- Watch for uneven ground, hidden holes, and obstructions.
- Never visit a cemetery alone — bring a friend, relative, or fellow volunteer.
- Carry a fully charged cell phone and keep it on your person.
🍁 Reserving a Cemetery
Before photographing a cemetery, sign up and wait for confirmation. This reserves the cemetery in your name and avoids duplicate efforts.
- One-at-a-time rule: Start by reserving one cemetery.
- After completing it, you may reserve up to five at a time.
- To sign up, go to the cemetery page and fill out the ‘Volunteer to share or photograph’ form.
- Can’t find the cemetery listed? Use our alternate sign-up form.
🍁 Cemetery ID Code
Each cemetery has a unique ID code to avoid confusion between cemeteries with the same name.
- You can find the code:
- On the cemetery’s webpage
- In the URL (e.g.,
MBERD0212)
- Always include this code in communication with the volunteer coordinator.
🍁 Choosing a Cemetery
You’re welcome to photograph any Canadian cemetery not already done.
Options include:
- One near your home
- One of personal/family interest
- One recommended by your province/territory coordinator
Note: Coordinators may not have information on cemetery size or accessibility — they only know what’s on the cemetery page.
🍁 Permission to Photograph
Some cemeteries may require permission — especially if privately owned or on private property.
When seeking permission, feel free to share:
- This is a 100% Canadian volunteer project.
- We aim to help genealogists access photos they can’t take themselves.
- If willing, you can provide the cemetery with a copy of the final photos and index.
- Once published, the cemetery can link to the online page.
- We’re happy to follow reasonable parameters (e.g., limit photos to stones with death dates older than provincial death registration release dates).
Questions? The caretaker or board is welcome to contact us at: cgwcemproj@gmail.com
🍁 Large Cemeteries
Large cemeteries can be manageable with these approaches:
- Divide & conquer: Most are divided into sections. Choose one section and focus only on that.
- Start with the oldest or smallest section.
- Doing one section makes it easier for others to continue where you left off.
- Group effort: Team up with family, friends, or other volunteers. Assign a section to each pair or person.
🍁 Partial vs. Full Submissions
While we encourage full cemetery documentation, partial submissions are still valuable.
Each headstone might be the key to someone’s family history.
Please sign up before starting so we can coordinate efforts and avoid duplication.
No need to complete the cemetery in one go — work on your schedule.
Just keep us updated on your progress.
Taking Photos
🍁 Needed Photos
Please include all of the following:
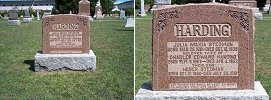
- Headstone Photos:
Photograph each side of any stone with an inscription.- Some stones may need just one photo.
- Others may need several, depending on how many sides have writing.
- No need to photograph blank sides.
- Scenery Photos:
Capture the overall look of the cemetery by taking a few wide-angle shots from various locations within the cemetery. - Sign Photos:
Include one or two clear photos of the cemetery sign.
🍁 Tips for a Successful Photo Session
- Take a Friend:
Never visit a cemetery alone. Bring someone for safety, assistance, and company.- Also: Bring a cell phone, fully charged and kept on your person, not in the car.
- Helpful Tools:
- Dark umbrella: Reduces glare and enhances legibility.
- Soft bristle broom or brush: Gently removes leaves or twigs.
- Notepad & pencil: For stones that won’t photograph well.
- Flashlight or mirror: Helps create shadows to highlight inscriptions.
- Time of Day:
The position of the sun can impact visibility.- Some stones photograph better with sunlight shining directly on them, others do better with the sun behind them.
- Weather:
Overcast or drizzly days often yield better results (no glare, some inscriptions stand out when wet). - Angles Matter:
Taking photos from an angle can:- Reduce glare
- Reveal hard-to-read inscriptions
- Eliminate reflections from polished stones
- Additional Resources:
- Ken’s Photo Tips – Working with ground stones, cleaning, and mirrors
- Kate’s Cemetery Kit
- Snow trick – Using snow to bring out inscriptions
- Ken Lowe’s Tips – Using off-camera flash
🍁 Large Monuments
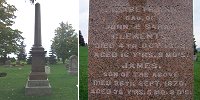
- Take one photo of the full monument to show context.
- Then take close-ups of each inscribed side.
🍁 Megapixels
- Use a camera setting of at least 3 megapixels (MP)
- This results in photos about 2048 x 1536 pixels, ideal for clarity and cropping.
🍁 Old Stones
Even unreadable stones should be photographed — someone else might recognize or decode them later.
🍁 Cleaning Stones
Be cautious! Many headstones are fragile. Here’s how to help without harming:
❌ What Not to Do
- Don’t remove moss or lichen.
- Don’t use chalk, flour, markers, shaving cream, or chemicals.
- Don’t rub or scrape the stone.
✅ What You Can Do
- Use light, shadows, and angles to enhance visibility.
- Use a soft bristle brush to gently clear away leaves or grass.
- Create a light breeze (e.g., wave a book) to remove loose debris.
- When unearthing flat stones, do so very carefully to avoid damage.
Note: Some cemeteries prohibit cleaning or disturbing stones. Always check for posted rules before proceeding.
🍁 Mapping the Cemetery
Help us locate the cemetery by providing any of the following:
- The address or nearby landmarks
- Step-by-step directions
- A Google Maps pin or GPS coordinates (you can drop a pin and copy the link)
Editing Photos
🍁 Cropping Photos
Photos can be cropped to remove unnecessary background, which is especially useful before resizing.
- Cropping improves readability by keeping the headstone the central focus.
- A cropped photo can make the stone appear larger and clearer, even if the overall photo dimensions remain the same.
📌 Tip: Always crop before resizing.
🍁 Resizing Photos
After cropping, resize your photos as needed.
- Preferred size: 800×600 pixels
- Minimum acceptable size: 640×240 pixels
- Smaller than 640×240? Please do not submit unless absolutely necessary.
Proper resizing ensures:
- The inscription is legible
- The image loads quickly for users
- The stone remains the focus of the image
💡 Most photos on our site are 800×600 — big enough to read, small enough to load quickly.
🍁 Renaming Photos
Renaming is optional.
- Camera-generated filenames (e.g.,
IMG_1234.jpg) are fine. - We rename all photos before adding them online to reflect their cemetery ID.
✅ Optional Tip:
If you’re not indexing and know the name on a hard-to-read stone, you may rename the photo using that info (e.g., SMITH_Jane.jpg) to help us process it faster.
🍁 Duplicate Photos
Please avoid submitting duplicate photos.
📷 Send only one copy of each headstone photo, even if:
- Multiple people are named on it
- You took several versions
✅ Exceptions:
- If the stone has inscriptions on multiple sides, submit:
- One photo per inscribed side
- One photo of the entire stone
🍁 Indexing Photos
If you plan to index your photos, please check out our indexing FAQ first for guidance before starting.
Sending Photos
🍁 Zipping Photos
Zipping is not required, however:
- A ZIP file helps reduce time and effort when sending or receiving large batches of photos.
- Zipping does not damage or alter your original photos.
- Both Windows and Mac come with built-in zipping tools.
❌ Please do not use .rar files or WinZip (it requires special software).
✅ When naming your ZIP file, please include:
YourName-CemeteryID-CemeteryName.zip
Example: JohnDoe-MBERD0212-XYZCemetery.zip
🍁 Batch Downloading
We cannot accept submissions that require downloading photos one at a time.
- Submissions must allow batch downloading (download all files in one go).
- This saves time for volunteers and helps get your submission online faster.
🍁 File Size
Choose your submission method based on the total size of your files:
- < 5MB – Submit via form or email attachment
- 5MB–25MB – Email attachment is acceptable
- > 25MB – Send as multiple email attachments, use cloud storage, or the postal service
🍁 Submission Options
- Online Upload
- To use this option:
- Go to the cemetery’s page
- Click ‘Volunteer to share or take photographs’
- In the comments, request an upload link
- A coordinator will reply with a link for you to upload your files
- Form Attachment
- Only one file under 5MB can be attached (this includes one zip file containing multiple images)
- Use the ‘Add a name or photo’ form on the cemetery page
- Email Attachment
- Total size must be under 25MB per email
- Multiple emails are okay if needed
- Use the ‘Add a name or photo’ option on the cemetery page and indicate you’d like to submit by email
- You’ll receive a reply with instructions and the email address to send your photos
- Cloud Storage
- Share a ZIP file or folder (unzipped is fine) using any cloud service that:
- Does not require an account to download
- Allows batch downloading
- 📁 Recommended Cloud Services:
- Google Drive – 15GB free
- OneDrive – 5GB free
- Dropbox – 2GB free
- After uploading, share the folder or file with: cgwcemproj@gmail.com
- Postal Service
- Prefer mailing physical media? No problem!
- Copy your photos to a CD, DVD, flash drive, or SD card
- Request a mailing address via the ‘Add a name or photo’ form on the cemetery page
- ⚠️ Important:
- Use stiff cardboard to protect fragile items like SD cards
- We cannot reimburse postage
- We are not responsible for lost or damaged media so be sure to keep a copy
- Include your return address if you’d like your media returned
- ⚠️ Important: